When I first used henna to dye my hair, the kitchen smelt like an old drugstore. The air smelt like wet dirt and dried leaves, which felt warm and strange, like someone had soaked the dirt in hot water. On the counter was a ceramic bowl full of deep green paste that looked like melted chocolate mixed with plant matter. I stopped for a second with the spoon over the bowl and thought about whether this muddy mix could really work as well as the shiny boxes of hair dye at the drugstore. After that, I dipped the brush in the paste, parted my hair, and spread it through the strands. The henna felt thick and cool on my scalp, like a face mask, and it stained my hands and hair. Later, it changed how I thought about beauty.
Safe Natural Henna Hair Dye Recipes
Why Henna Still Feels Like Magic in a World Full of Chemicals
The hair dye aisle in a store can be overwhelming. The smells of strong chemicals, big promises, and tiny print warning labels can all be too much. Many people are okay with using ammonia, peroxide, and synthetic formulas as a trade-off for getting the perfect colour. Henna is a whole different thing. Henna comes from the Lawsonia inermis plant and has been used for thousands of years to naturally colour hair, skin, and fabric. When mixed with warm liquid, its lawsone pigment slowly comes out and sticks to keratin. Henna doesn’t strip hair; instead, it wraps each strand in a clear layer of colour, making hair stronger, shinier, and look healthier. The smell is earthy and real, like leaves and tea instead of perfume. This makes colouring your hair a calming ritual instead of a quick chore.
How to Pick Pure Henna with Honest Labels
Henna quality is the most important thing. Real henna should be a pure powder that is good for body art and doesn’t have any metallic salts or synthetic dyes in it. People have a lot of bad experiences with “compound” hennas that have chemicals in them that aren’t obvious. Henna that is good feels soft and finely sifted, smells fresh and grassy, and never sparkles or smells fake. Freshness is important because henna loses its ability to stain over time. Reading labels carefully and getting things from responsible sources is now part of the process. You’re not just buying colour; you’re also picking a plant that was grown in the sun and soil and carefully picked and ground. When you treat henna like a living thing, the results on your hair are noticeably better and more consistent.

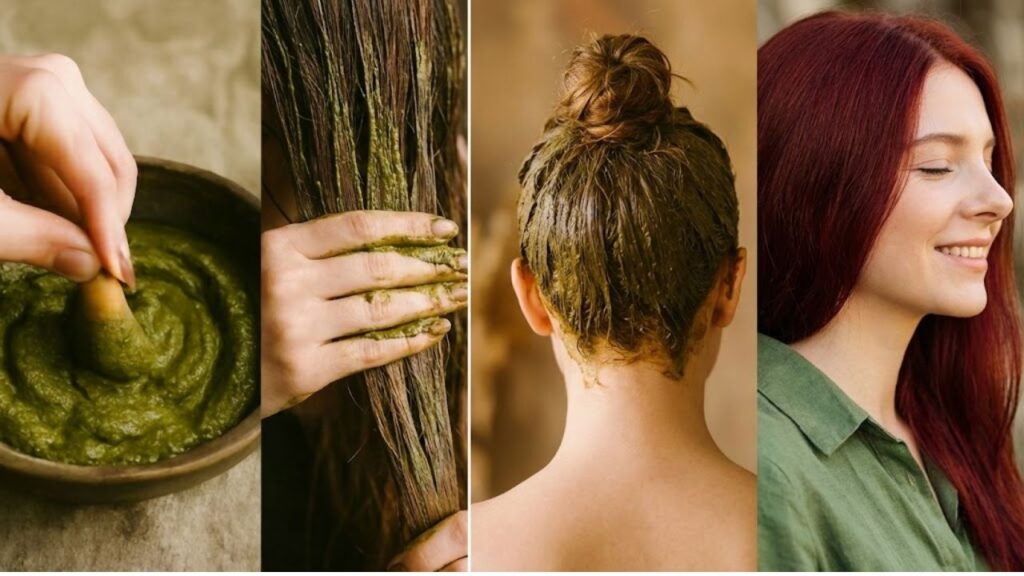
Making a Simple Henna Kit
You don’t need to buy expensive tools to use henna. You only need a bowl made of glass, ceramic, or stainless steel, a spoon, gloves, an applicator brush, plastic wrap, and an old towel. Stay away from metals that react with other metals, and always wear gloves and protect your clothes. Patience is more important than tools. Henna takes a long time to work; it releases dye over hours instead of minutes. Henna feels more like cooking a slow meal than using instant chemical dyes. It’s planned, not rushed, and much more satisfying in the end.
A Classic Henna Recipe for Copper Tones
The easiest recipe makes copper colours that are warm. Mix pure henna powder with strong, hot tea until it is the same consistency as yoghurt. If your scalp can handle mild acidity, you can add lemon juice or apple cider vinegar to help the dye come out. Let the mixture sit for four to eight hours, or until the colour gets darker. Put it on clean hair, wrap it up, and leave it on for 2 to 4 hours. After rinsing, the colour may look bright orange at first, but it will turn into a more natural copper or auburn colour over the course of a few days, depending on the colour of your hair.
Making Auburn and Brown Colours Of course
You can make henna softer or darker by mixing it with other plant powders. When you mix henna with amla, it makes the colour less bright and adds cooler auburn tones while keeping the texture of the hair. For brown or chocolate colours, the best way to do it is in two steps: first, put on henna to make a red base, and then put on indigo to make the colour darker. This method gives you better control and more predictable results, especially on light to medium hair. It can make colours from chestnut to almost black.
- Amla Powder: Softens strong red tones into cooler auburn and adds body to hair. This is great for anyone who wants to get rid of orange tones and get a balanced brown-red colour.
- Indigo PowderChanges the colour of henna to dark brown or almost black.People who want grey coverage or dark brunette results
- Cassia (Henna Neutral)Adds a little colour and a light golden glow to make things shine more.Blonde or light hair types that want shine and warmth
- Black Tea or CoffeeGives hair a little more depth and richness to its overall tone.Medium to dark hair that needs a deeper, fuller colour finish
- Tea with chamomileNaturally brightens with a soft, warm golden glowLight hair colours that want a soft, sun-kissed look
- Gel from Aloe VeraMakes it easier to keep moisture and makes the paste smoother.Hair that is dry, curly, or weak and needs more moisture
- Essential oils like rosemary and lavenderMakes the scent stronger and may calm or wake up the scalp.People who are sensitive to the smell of henna or who care about how their scalp feels
Henna Gloss for a Little Colour and Shine
A henna gloss is perfect if you want a soft look. Combine a small amount of henna paste with a conditioner that doesn’t have silicone in it. Then, put it on your hair like a mask. Let it sit for 45 to 90 minutes before rinsing it off. This method gives you soft highlights, warmth, and shine without changing the colour too much. It’s a great way to try henna out before you buy it.

Layering to Find Your Perfect Shade
Henna adds colour slowly. Each application makes the colour deeper, shinier, and richer. If you have light hair, it turns golden-copper; if you have medium hair, it turns chestnut or auburn; and if you have dark hair, it shows subtle red tones in the sun. Instead of disappearing completely, grey strands turn into warm highlights. Since henna fades slowly, it’s best to start off slowly. You can always make the colour darker with future applications without hurting your hair.
Safety, patch tests, and hair history
Even dyes made from plants need to be taken care of. Always do a patch test to see if you’re sensitive. Put a little bit on your skin, rinse it off, and watch it for 24 to 48 hours. If your hair has been dyed with chemicals before, especially ones with metallic salts, be careful. Most of the time, pure henna is safe, but products that aren’t made well can cause problems. Use oil to protect your hairline, open a window, and give the process enough time to work without rushing.
Long-Term Results and Aftercare
It takes a long time to rinse henna off, but warm water and patience will get rid of all of it. A lot of people don’t wash their hair for the first 24 hours so the colour can settle. The colour gets darker and stays that way over the course of a few days. Henna colour lasts a long time if you wash it gently and don’t use too many sulphates. Regular root touch-ups or gloss treatments every now and then keep the colour even and the hair strong and shiny.
The Quiet Strength of Hair Colour Made from Plants
Henna doesn’t fight with your hair; it works with it. Greys turn into highlights, and natural differences add to the beauty. Choosing henna is a small act of rebellion against harsh chemicals and beauty standards that are too fast. It asks for patience, down-to-earthness, and connection. The end result isn’t a perfect salon shade; it’s a colour that changes over time, with light, and with nature. It feels very personal and grounded.